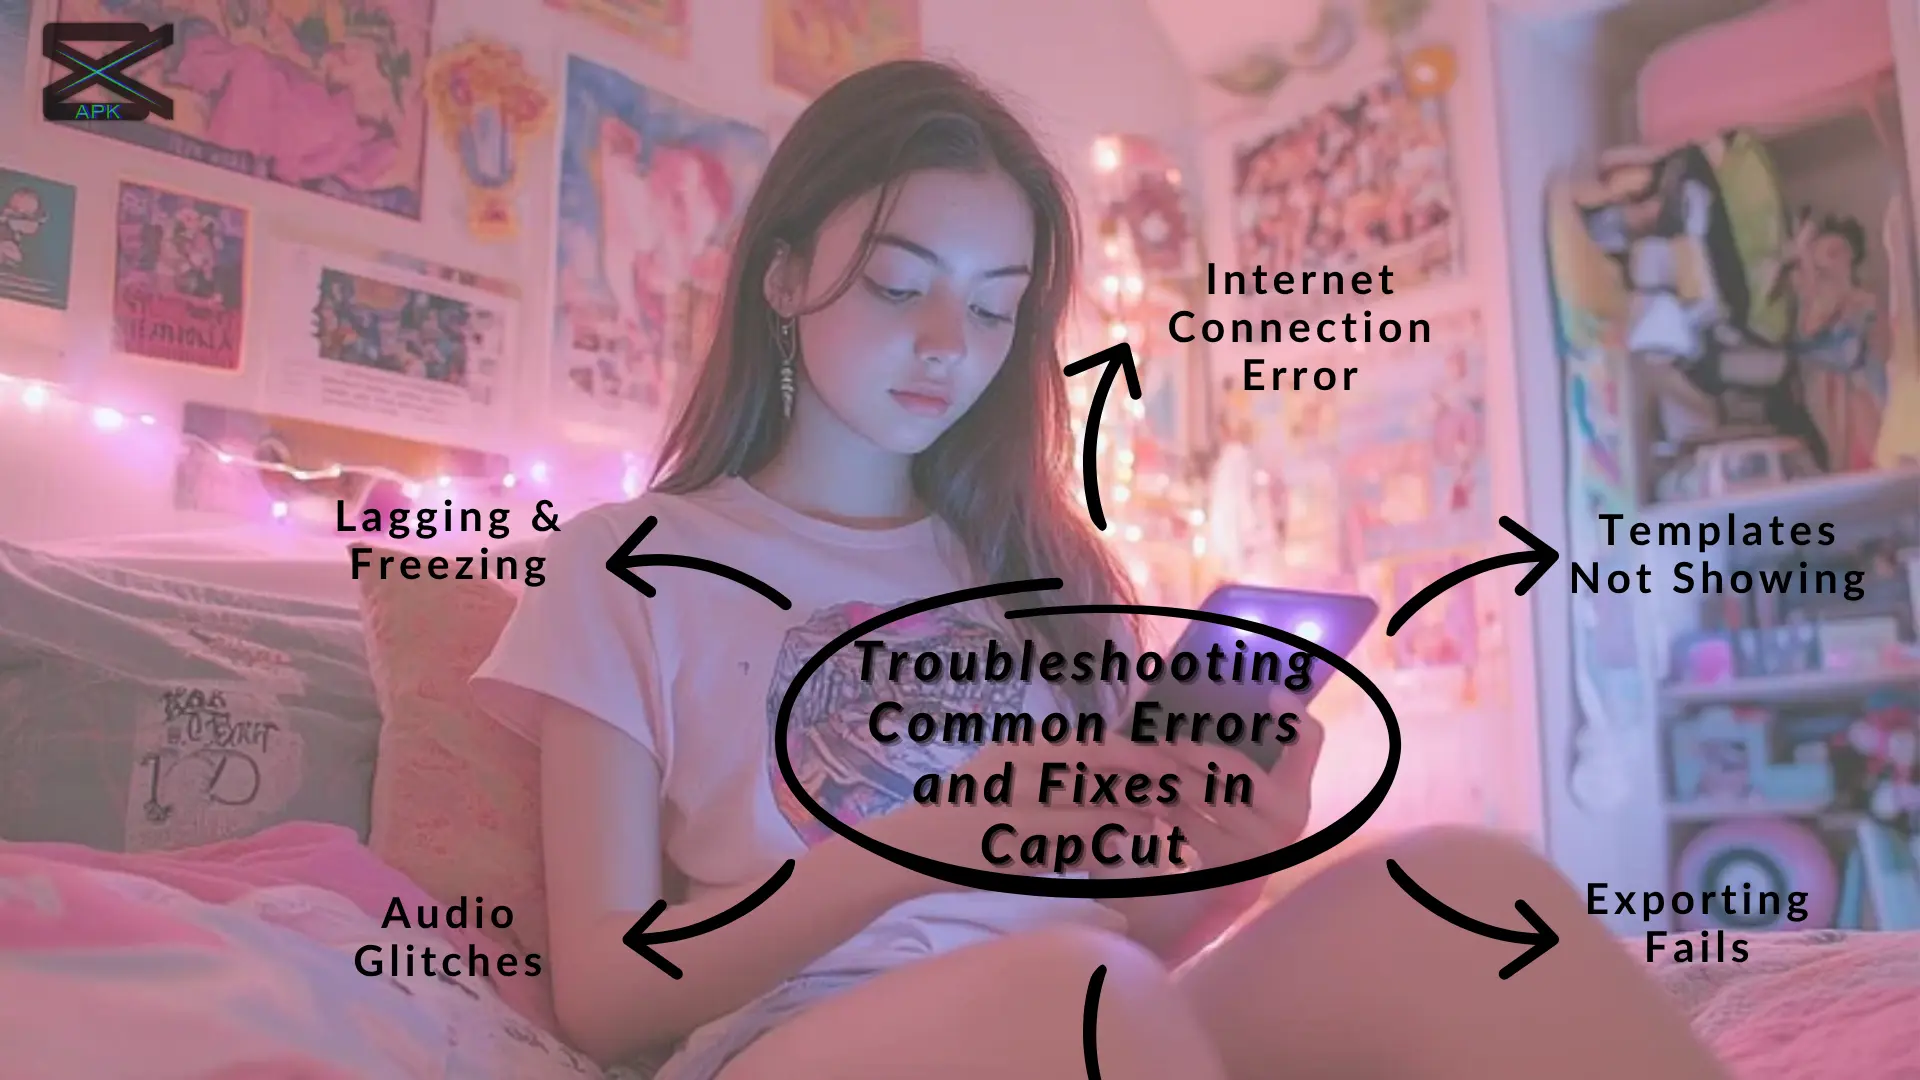
Troubleshooting Common Errors and Fixes in CapCut
This comprehensive guide is designed to be your definitive resource for troubleshooting. We’ll move beyond the simple “restart your device” advice and dive deep into a systematic, step-by-step process to diagnose and resolve the most persistent issues—from foundational app health and system conflicts to specific feature malfunctions and performance bottlenecks. Consider this your complete roadmap to fixing what’s broken and getting back to what matters: creating amazing content.
Introduction
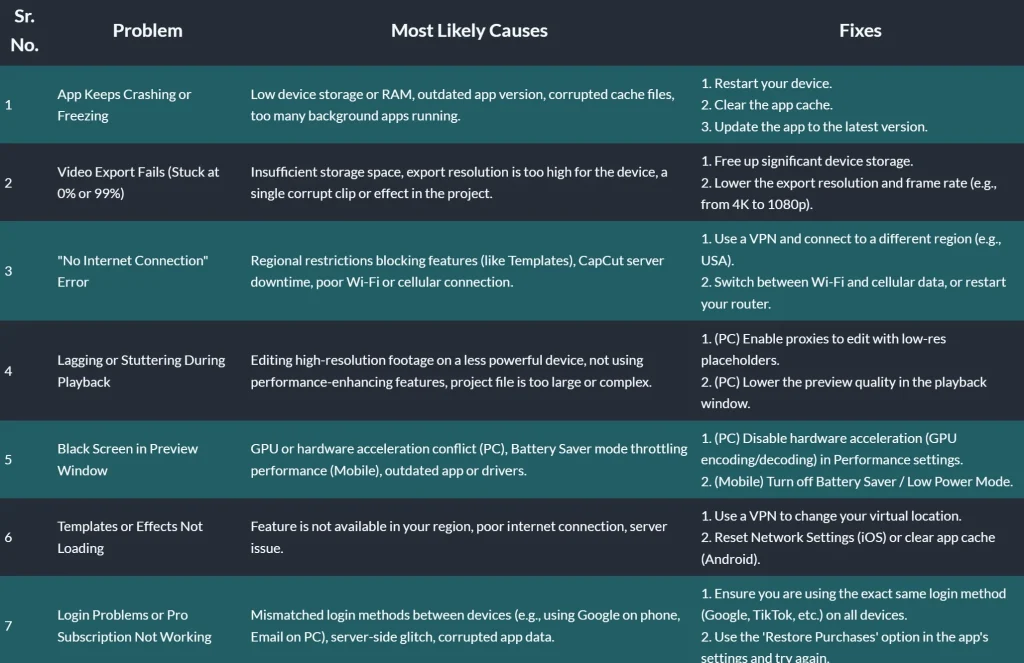
The Quick Fix Cheat Sheet
For users seeking immediate solutions to the most prevalent issues, this table serves as a rapid diagnostic tool. It identifies common problems, their most likely causes, and the most effective first-line fixes. Each solution links to a more detailed explanation within the full guide.
Part 1: Foundational Troubleshooting: The Universal First Aid Kit
Before diving into specific error codes or feature malfunctions, a series of foundational troubleshooting steps can resolve a vast majority of common CapCut issues. These actions address the application’s local environment on a device, which is often the source of instability. Video editing is a resource-intensive task that generates a significant amount of temporary data; when this data becomes corrupted or disorganized, the app’s performance can degrade, leading to crashes, freezes, and other unexpected behavior. The following steps should be performed in order, as they represent a logical progression from least to most invasive.
1.1 The Golden Rule: Restart Everything
The single most effective and least disruptive first step in troubleshooting is to restart the device, whether it’s a smartphone or a computer. This simple action accomplishes several critical tasks. It clears the device’s temporary memory (RAM), which may be cluttered with residual data from previously used applications. It also terminates all background processes that could be consuming system resources or conflicting with CapCut’s operation. Many seemingly complex software glitches are transient and can be resolved by forcing the system to start with a clean slate. Before attempting any other fixes, a full device restart is the recommended starting point.
1.2 The Cache Cleanse: A Fresh Start for Your App
If a restart does not resolve the issue, the next step is to clear CapCut’s cache. The cache is a storage location where the app keeps temporary files—such as thumbnails, effect previews, and other data—to speed up performance during regular use. Over time, these files can accumulate, consume significant storage space, and, most importantly, become corrupted. A corrupted cache is a primary cause of a wide range of problems, including the app failing to open, crashing during use, features not loading correctly, or general sluggishness. Clearing the cache removes these temporary files without deleting projects, media, or account information, often providing an immediate fix.
The method for clearing the cache varies by platform:
- In-App Method (All Platforms): The most direct way to clear the cache is within the CapCut app itself. Navigate to the Me tab (or your profile section), tap the Settings icon (a small gear, usually in the top-right corner), and select the Clear Cache option. Confirm the action and then restart the app.
- Android System Settings: For a more thorough cleanse, users can go through the Android operating system. Navigate to
Settings > Apps(orApp Management), find CapCut in the list, tap on it, and then selectStorage & Cache. From here, tap the Clear Cache button. It is important to tap “Clear Cache” and not “Clear Data” or “Clear Storage” at this stage, as the latter will erase all project files and settings. - iOS (Offload & Reinstall): The iOS operating system handles cache differently. The most effective method is to “offload” the app. This process removes the application itself but preserves all its documents and data, including projects. When the app is reinstalled, it returns with a clean cache and a fresh installation. To do this, go to
Settings > General > iPhone Storage. Scroll down to find CapCut, tap on it, and select Offload App. After the app has been offloaded, the button will change to “Reinstall App.” Tapping it will download the latest version from the App Store while keeping all user data intact. - Windows System Settings: On a PC, a similar function can be performed. Go to
Settings > Apps > Apps & features. Find CapCut in the list, click on it, and select Advanced options. Here, users will find a Reset button. This action will clear the app’s data, effectively resetting it to its default state.
1.3 The Clean Slate: A Full Reinstallation
When clearing the cache and restarting the device fail to solve the problem, a complete reinstallation is the final foundational step. This process is necessary when the core installation files of the application itself are suspected to be corrupted, which can happen during an incomplete update or an initial download from an untrusted source. A clean reinstall ensures that any deep-rooted file corruption is completely eliminated and that the user is running the latest, most stable version of the software available from an official source.
The process is straightforward but should be followed precisely:
- Uninstall CapCut: Completely remove the application from the device through the system’s standard uninstallation process.
- Restart the Device: Perform a full reboot of the phone or computer to clear any remaining temporary files associated with the old installation.
- Reinstall from an Official Source: Download and install the latest version of CapCut exclusively from the Apple App Store, Google Play Store, or the official CapCut website for PC. Avoid third-party APK sites, as they can be a source of outdated or modified versions that cause instability.
Part 2: System & Environment Health Check
Many issues attributed to CapCut are not flaws within the app itself but are symptoms of problems with the user’s device or network environment. Because video editing is highly demanding, the app’s performance is intrinsically linked to the health of the system it runs on. This section covers how to diagnose and resolve these external factors.
2.1 Device Compatibility & System Requirements
A fundamental prerequisite for CapCut to function is a compatible device and operating system. Using the app on unsupported hardware or an outdated OS is a common source of installation failures, crashes, and feature unavailability.
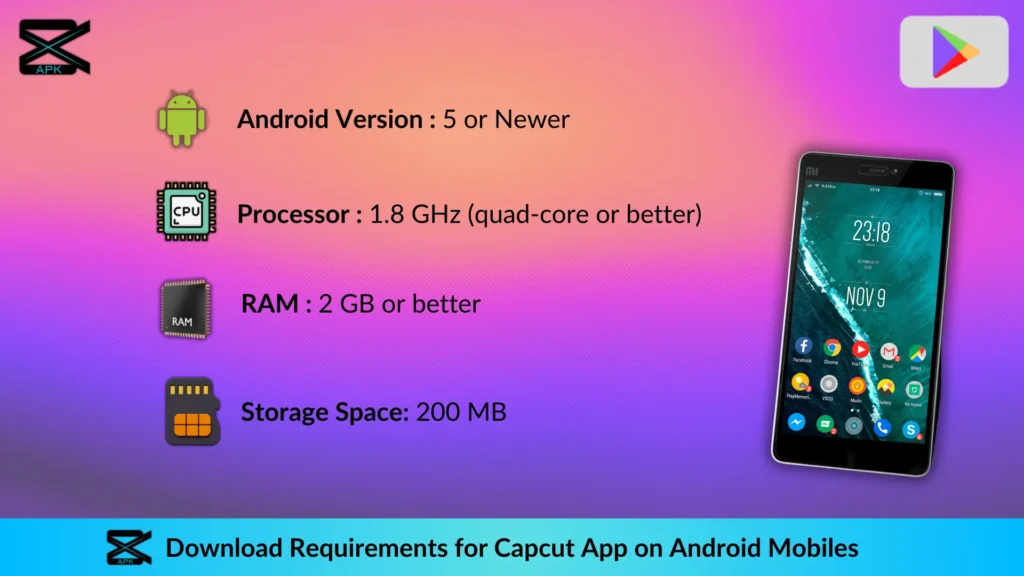
- Minimum System Requirements: To ensure smooth operation, the device must meet the following minimum specifications :
- Android: Version 5.0 or higher.
- iOS: Version 12.0 or later is recommended for stability, though some sources note a minimum of 11.0.
- Windows: A 64-bit version of Windows 10 or later.
- Updating Your Operating System: An outdated OS can lead to significant compatibility conflicts with modern applications. App developers typically optimize for the latest OS versions, and running an older one can cause a wide range of errors. Users should regularly check for and install system updates.
- On iOS: Go to
Settings > General > Software Update. - On Android: Go to
Settings > System > System update(this path may vary slightly by manufacturer). - On Windows: Go to
Settings > Update & Security > Windows Update.
- On iOS: Go to
2.2 Storage & Memory: Fuel for Your Edits
Video editing is one of the most resource-intensive tasks a device can perform. It requires substantial free storage for project files, rendered clips, and temporary data, as well as sufficient RAM to process edits in real-time. Inadequate resources are a leading cause of crashes, freezing, and export failures.
- The Rule of Thumb: For optimal performance, it is recommended to have at least 1GB of free storage and 2GB of RAM available before starting an editing session in CapCut. For large or 4K projects, these minimums should be considered a starting point, with more being better.
- How to Check and Free Up Space:
- Mobile (iOS/Android): Users can check their available space by navigating to the “Storage” section within their device’s settings. To free up space, it is recommended to delete unnecessary files, offload unused apps, and transfer large media files (photos and videos) to cloud storage or an external drive.
- PC (Windows): On a computer, users should ensure the drive where CapCut is installed and where exports are saved has ample free space. The built-in “Disk Cleanup” tool can be used to remove temporary files. More importantly, freeing up memory (RAM) is crucial. This can be done by opening the Task Manager (using the shortcut
Ctrl + Shift + Esc) and closing any unnecessary background applications that are consuming CPU and RAM resources.
2.3 Network & Connectivity: The Unseen Dependency
While basic editing can be done offline, many of CapCut’s most popular features are dependent on a stable internet connection. The app needs to connect to its servers to download assets like effects, stickers, fonts, and music from its library. It also requires a connection for syncing projects to the cloud, logging into an account, and accessing online templates. A weak or unstable connection can manifest as features failing to load, downloads getting stuck, or login errors.
- Troubleshooting Steps:
- Test Connection: Use an online speed test tool to verify internet speed and stability.
- Reset Network: A simple but effective fix is to reset the device’s network connection by toggling Wi-Fi and/or Cellular data off and then on again.
- Isolate the Network: If the problem persists, try connecting to a different network (e.g., switch from Wi-Fi to cellular data, or connect to a different Wi-Fi network) to determine if the issue is with the local network or the device itself.
- Check App Permissions (Mobile): Ensure that CapCut has the necessary permissions to use cellular data. On some devices, this can be found in the cellular network settings, where users can allow the app to use “Wi-Fi and cellular”.
2.4 Server Status, Regional Locks, and VPNs
Sometimes, the problem isn’t on the user’s end at all. Issues can stem from CapCut’s own servers or from regional restrictions placed on its content.
- Is CapCut Down?: Before extensive troubleshooting, it is wise to check if CapCut’s servers are experiencing downtime. This can be done by visiting third-party status-tracking websites like Down Detector or by checking CapCut’s official social media channels for announcements from other users or the company itself. If the service is down, the only solution is to wait for it to be restored.
- Regional Restrictions and the “No Internet Connection” Error: A significant point of confusion for many users is encountering a “No Internet Connection” error even when their internet is working perfectly. This often occurs when trying to access features like Templates or certain effects. This error message is frequently misleading. The actual cause is often a regional lock; the app is connecting to the internet but its servers are blocking access to the feature based on the user’s geographic location (determined by their IP address). This is a critical distinction, as it prevents users from needlessly troubleshooting their own network.
- The VPN Workaround: The most widely cited and effective community solution for bypassing these regional locks is to use a Virtual Private Network (VPN). A VPN allows a user to route their internet traffic through a server in another country, making it appear as though they are accessing the app from that location. By connecting to a VPN server in a region where the desired features are available (such as the United States or Canada), users can often unlock access to the full library of templates and effects. While this is a popular workaround, users should be aware of the terms of service for both the VPN provider and CapCut.
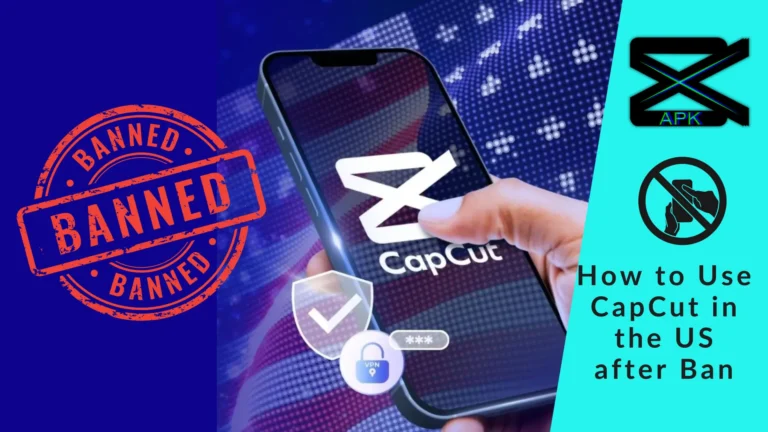
- Geopolitical Impact on Functionality: In rare cases, app functionality can be impacted by legal and political factors. CapCut, being owned by ByteDance, has been classified as a “foreign adversary controlled application” in some jurisdictions, such as the United States. This has led to legal frameworks that could ban the distribution or updating of the app. If CapCut requires an update to continue functioning and that update is blocked by law from being distributed through official app stores, the application may cease to work properly. This is an extreme but possible non-technical root cause for which no amount of user-side troubleshooting can provide a fix.
Part 3: Core Application Failures: Crashing, Freezing, and Black Screens
This section addresses critical failures that render the app unusable, such as the inability to open the application, frequent crashes during editing, and the appearance of a black screen in the preview or timeline. The root causes for these issues often differ between mobile and PC platforms, requiring distinct troubleshooting approaches. Mobile issues are typically tied to overall device resource limitations and power-saving modes, while PC problems are more frequently linked to specific hardware components like the graphics card (GPU) and their corresponding drivers.
3.1 App Won’t Open or Gets Stuck on Loading Screen
When CapCut fails to launch entirely or becomes unresponsive on its initial loading screen, it usually points to a fundamental conflict or corruption in the app’s data or its interaction with the operating system.
- Solutions (in order of application):
- Force Close and Restart: First, attempt to force close the application completely and then reopen it.
- Restart the Device: If the issue persists, a full device restart can clear underlying system conflicts.
- Clear App Cache: A corrupted cache is a very common culprit for startup failures. Follow the platform-specific instructions in(#12-the-cache-cleanse-a-fresh-start-for-your-app) to clear the cache.
- Perform a Clean Reinstall: If the above steps do not work, the app’s core files may be damaged. A complete uninstallation, device restart, and reinstallation from an official source is the next logical step.
- PC-Specific Fix (Windows Language Setting): A unique and highly effective solution discovered by the user community involves the Windows display language. For some users, CapCut fails to start on a fresh installation. The fix is to go into Windows
Settings > Time & Language, add English (United States) as a language, and set it as the primary Windows display language. After logging out and back in (or restarting), CapCut should launch successfully. Once the app has run for the first time, the display language can be changed back to the user’s preference without affecting future launches.
3.2 App Crashes or Freezes During Editing
Sudden crashes or freezes in the middle of an editing session are highly disruptive and can lead to lost work. These problems are almost always a sign that the device is struggling to keep up with the demands of the editing process.
- Solutions:
- Resource Management: The most immediate action is to free up system resources. Close all other applications running in the background to maximize the amount of available RAM and processing power for CapCut. Additionally, ensure the device has ample free storage space, as the app uses it for temporary render files.
- Power Settings: Disable any active Battery Saver or Low Power Mode. These modes are designed to conserve energy by throttling the device’s performance, which can directly cause lag and crashes in resource-heavy apps like CapCut.
- Reduce Project Complexity: Very large video files (especially 4K footage) or projects with numerous layers, effects, and transitions can overwhelm even powerful devices. If crashes are frequent on a specific project, consider breaking it into smaller, more manageable parts. Edit and export these smaller segments individually, then combine them in a new, final project.
- PC Performance Boost (Proxies): For PC users experiencing lag and freezing, the most impactful solution is to use proxies. Proxies are low-resolution copies of the original media files that are used during the editing process. This allows for smooth, real-time playback even with high-resolution footage, as the system is handling smaller files. The final export will still use the original, high-quality files. To enable this feature, click the Modify button above the timeline, navigate to the Performance tab, and turn on Proxy. Setting the resolution to 540p is often sufficient to eliminate lag.
3.3 The Black Screen Problem (Preview or Timeline)
A black screen appearing in the video preview window or on the timeline itself indicates a failure in the video rendering pipeline. This is often a graphics-related issue, where the software is unable to correctly process and display the video frames.
- Solutions:
- Mobile (iOS/Android):
- Disable Battery Saver Mode: As with crashes, power-saving modes can interfere with the GPU’s ability to render video, leading to a black screen. Disabling this mode is the first step.
- Reinstall the App: An incompatible or corrupted version of the app can cause display issues. A clean reinstallation can often resolve these conflicts.
- PC (Advanced Graphics Settings): On desktop computers, black screen issues are almost always tied to the graphics card (GPU) and its settings.
- Disable Hardware Encoding: This is a primary fix. Hardware encoding uses the GPU to accelerate video processing, but it can sometimes lead to conflicts. To disable it, go to the CapCut
Menu > Settings > Performanceand uncheck the box for “Speed up hardware encoding”. After saving the change, restart CapCut and try the project again. - Disable All Performance Options: Some users have found success by disabling all options in the
Settings > Performancetab. This forces the software to rely on the CPU for rendering, which can bypass GPU-specific bugs. - Update Graphics Drivers: Outdated graphics drivers are a very common cause of rendering problems, including black screens, on PCs. The drivers are the software that allows the operating system to communicate with the graphics card. Users should visit the official website for their GPU manufacturer (e.g., NVIDIA, AMD, or Intel) and download and install the latest available drivers for their specific model.
- Disable Hardware Encoding: This is a primary fix. Hardware encoding uses the GPU to accelerate video processing, but it can sometimes lead to conflicts. To disable it, go to the CapCut
- Mobile (iOS/Android):
Part 4: Feature-Specific Malfunctions
Even when the application is running smoothly, individual tools and features can fail to work as expected. This section provides dedicated troubleshooting guides for some of CapCut’s most common feature-specific problems, from failed exports to malfunctioning AI tools.

4.1 Video Export Failures (Stuck at 0% or 99%, “Export Error”)
One of the most frustrating errors occurs at the final step: exporting the finished video. An export can fail to start (stuck at 0%), get stuck near the end (stuck at 99%), or display a generic “Export Error” message. These issues typically point to a problem with either device resources or a specific element within the project timeline.
- Troubleshooting Checklist:
- Check Storage: The export process requires a significant amount of temporary disk space to render the new video file. A common mistake is not having enough free storage. As a rule, ensure there is at least two to three times the estimated final file size available in free space on the device.
- Lower Export Settings: High-resolution exports (4K) and high frame rates (60fps) are extremely demanding on a device’s processor and memory. If an export fails, the most effective solution is often to reduce these settings. Try exporting at a lower resolution like 1080p or 720p, and a frame rate of 30fps.
- Close Background Apps: Free up all available system resources by closing every other application on the device. This ensures CapCut has maximum access to the CPU and RAM for the intensive rendering process.
- PC – Disable Hardware Encoding: Similar to fixing black screen issues, disabling hardware encoding can resolve conflicts that occur during the final render. In CapCut for PC, navigate to
Menu > Settings > Performanceand uncheck “Speed up hardware encoding”. - Isolate the Corrupt Element: If an export consistently fails at the same percentage (e.g., 54%), it strongly suggests a corrupted media file, effect, or transition at that specific point in the timeline. To diagnose this, try exporting the project in smaller sections. For example, export the first half of the video, and then the second half. If one section exports successfully and the other fails, the problem lies within the failing section. Continue to narrow down the problematic area, identify the specific clip or effect causing the failure, and then remove and replace it.
- Recreate the Project: In rare cases, the project file itself can become corrupted beyond repair. If none of the above solutions work, the only remaining option may be to start the project again from scratch in a new project file.
4.2 Audio Glitches & Sync Problems
Audio issues can range from sound not playing at all to the audio falling out of sync with the video, particularly after exporting. These problems can stem from incompatible file formats or technical characteristics of the source recording.
- Solutions:
- No Audio or Audio Not Working: If an imported audio track is silent or causes errors, first try removing it from the timeline and re-importing it. If the problem persists, the audio file format may be unsupported or corrupted. Try converting the file to a standard format like MP3 before importing. For guaranteed compatibility, use a track from CapCut’s built-in music and sound effects library.
- Audio Out of Sync After Export: This is a very common issue, especially with video recorded on smartphones. Phones often record with a Variable Frame Rate (VFR) to save space, meaning the frame rate fluctuates. Editing software, including CapCut, works best with a Constant Frame Rate (CFR). This mismatch can cause the audio and video to drift apart over the duration of the clip.
- Manual Fix (Mobile/PC): The most direct way to fix this is to manually realign the audio. In the timeline, select the video clip and use the Extract Audio feature. This will create a separate audio track. Play the video and identify where the sync is off. Then, Split the audio track at that point and trim a small portion (e.g., a fraction of a second) to shift the rest of the audio back into alignment with the video.
- PC Auto-Sync Tool: CapCut for PC includes a powerful automatic synchronization tool. Import the video and the separately recorded audio into the timeline. Select both the video clip and the audio clip (by holding
CtrlorCmdand clicking on each), then right-click and choose Sync video and audio. The software will analyze the waveforms and automatically align the tracks.
4.3 Templates & Effects Not Showing/Loading
When the “Templates” tab is missing or effects in the library fail to load, the cause is almost never a bug in the traditional sense. This problem is overwhelmingly linked to regional restrictions or server-side issues.
- Solutions:
- Check Server Status: First, confirm that CapCut’s servers are not experiencing a widespread outage by checking a site like DownDetector or community forums.
- Use a VPN: This is the most reliable fix. As discussed in(#24-server-status-regional-locks-and-vpns), these features are often geographically restricted. Using a VPN to connect to a server in a region like the USA or Canada will typically cause the Templates tab and full effects library to appear immediately.
- Change Device Region (iOS): For iPhone users, an alternative to a VPN is to change the device’s region setting. Go to
Settings > General > Language & Region, tap on Region, and select a country like the United States. The device will perform a soft restart, and this change can sometimes trigger the features to become available in CapCut. - Check Network Permissions: Ensure CapCut has permission to use both Wi-Fi and Cellular data in your device’s settings, as a restricted connection can prevent it from downloading online assets.
- Clear Cache & Reinstall: If a network issue is ruled out, a corrupted cache can sometimes cause loading glitches. Clearing the cache or reinstalling the app may resolve the problem.
4.4 AI Feature Failures (“Script-to-Video” Not Generating)
CapCut’s AI tools, such as the “Script-to-Video” generator, can be powerful but are sensitive to the input they receive. If the feature fails to generate a video from a script, the problem is likely with the formatting of the text itself.
- Solution: Clean Up Your Script The AI model that processes the script reads the text exactly as it is written and can be easily confused by non-standard formatting. To ensure successful generation, the script must be “clean”.
- Remove All Special Characters: Delete any special characters from the script, such as colons (
:), semicolons (;), asterisks (*), and other symbols that are not part of standard punctuation. - Ensure Consistent Paragraph Spacing: Avoid inconsistent line breaks or extra empty lines between paragraphs. The script should have a clean, logical flow without unusual gaps.
- Remove All Special Characters: Delete any special characters from the script, such as colons (
Part 5: Performance Optimization: Curing Lag and Stutter
A smooth, lag-free editing experience is essential for creative flow. This section focuses on proactive strategies to optimize CapCut’s performance, particularly on PC, and to manage project files efficiently to prevent the app from becoming bloated and slow over time. It is important to distinguish between playback performance (the smoothness of editing in the timeline) and export performance (the ability to successfully render the final video). The tips below are primarily aimed at improving the former.
5.1 Optimizing Playback Performance (Primarily PC)
Laggy playback, where the video stutters or freezes in the preview window, is a common complaint, especially when working with high-resolution footage on systems that are not top-of-the-line. CapCut for PC offers several built-in tools to combat this.
- Enable Proxies: This is the single most effective method for eliminating lag. When enabled, CapCut creates low-resolution “proxy” files of the media. All edits are performed on these lightweight proxies, allowing for a fluid, real-time experience. When the final video is exported, CapCut automatically switches back to the original, high-quality files, so there is no loss in final quality. To enable this feature, click the Modify button located above the timeline, navigate to the Performance tab, and check the box to Turn on Proxy. A resolution of 540p is generally sufficient to ensure smooth playback.
- Lower Playback Quality: Independent of proxies, the quality of the video in the preview window can be adjusted. In the player window, there is a setting that may default to “Original.” Clicking this and selecting a lower quality setting will reduce the processing load on the system during playback, making the timeline more responsive.
- Adjust Project Settings: For particularly demanding projects, the overall project resolution and frame rate can be temporarily lowered during the editing phase. Click the Modify button and, in the “Project Settings” tab, change the resolution and frame rate to a lower value (e.g., 1280×720 and 30fps). This will make the entire project less demanding. These settings can be changed back to their original high-quality values just before the final export.
5.2 Efficient Project & Media Management
Over time, CapCut can accumulate a large number of old projects, cache files, and other data that can slow down the application and consume vast amounts of storage space. Proper project hygiene is key to maintaining long-term performance.
- Delete Old Projects: Once a video project is complete and the final file has been exported and backed up, the project file within CapCut should be deleted. These projects, especially those with large media files, take up considerable space and can contribute to app bloat and slower startup times.
- Empty the Trash: This is a critical and often overlooked step. When a project is deleted in CapCut, it is not immediately removed. Instead, it is moved to a “Trash” folder within the app, where it remains for approximately 30 days before permanent deletion. During this time, it continues to occupy storage space. To truly free up resources, users must manually navigate to the Trash section within CapCut and choose to Empty it, permanently deleting the contained projects.
- Split Large Projects: For exceptionally long or complex videos, such as feature-length films or multi-camera podcast edits, it is a best practice to break the work into smaller, more manageable project files (e.g., “Scene 1,” “Scene 2”). These smaller projects will be more responsive and stable. Once each segment is edited, they can be exported individually and then combined in a final, simple project for the last assembly.
Part 6: Installation & Update Issues
Problems can arise before a user even gets to the editing timeline, with installation and update processes sometimes failing. These issues are often platform-specific and require targeted solutions.
6.1 Installation Fails or Gets Stuck (PC)
On Windows PCs, users may encounter specific errors when trying to install CapCut from either the official executable file or the Microsoft Store.
- Stuck at 99% (“Cannot create shortcut”): This is a well-documented error that occurs when using the
.exeinstaller. The installation process appears to freeze at 99% and displays an error message about being unable to create a desktop shortcut. In most cases, the application has actually installed successfully despite this error message. The fix is to not uninstall the app. Instead, locate the original installer file, right-click on it, and select Run as administrator. When the installation window appears, click on “More” and untick the box for “Create shortcut.” Then, proceed with the installation. This should allow the process to complete without the error. - Microsoft Store “Uninstall Previous Version” Error: When attempting to install CapCut from the Microsoft Store, some users receive a message telling them to uninstall a previous version first, even if they believe none is installed. This indicates that remnants of a prior installation exist. To fix this, go to the Windows Add or remove programs settings, search for CapCut, and if any entry is found, uninstall it completely. After the uninstallation is finished, the Microsoft Store installation should proceed without issue.
6.2 Download Stuck on Pending (Mobile)
On Android devices, an attempt to download CapCut from the Google Play Store may result in the download being perpetually “stuck on pending.” This is typically an issue with the Play Store app itself, not CapCut.
- Solutions:
- Check Download Preference: In the Google Play Store settings, navigate to “Network preferences” and ensure that “App download preference” is set to Over any network. If it is set to “Over Wi-Fi only,” the download will not proceed on a cellular connection.
- Clear Play Store Cache and Data: A corrupted cache within the Google Play Store and its related services is the most common cause of this issue. To fix it, go to your device’s
Settings > Apps. First, find the Google Play Store, go to itsStorage & Cachesection, and tap both Clear Cache and Clear Data. Then, go back to the app list and do the same for Google Play Services. After clearing both, restart the device. - Switch Google Account: As a final step, if the download is still stuck, try switching to a different Google account within the Play Store. Open the Play Store, tap on your profile icon, and select a different active Gmail account. Attempting the download with a different account can sometimes bypass the glitch.
Part 7: Account, Login & Subscription Problems
For users who leverage CapCut’s cloud features or have a Pro subscription, account and login issues can be particularly disruptive. These problems often stem from a fragmented account system and inconsistencies in how users sign in across different devices.

7.1 Common Login Errors (“Couldn’t Sign In,” “Maximum Attempts Reached”)
Users may encounter various error messages when trying to log into their CapCut account, such as “Couldn’t sign in. Try again later” or “Maximum number of attempts reached.” These errors can be caused by server-side glitches, network problems, or temporary security lockouts.
- Solutions:
- Check Internet & Use VPN: As with other network-dependent features, login processes can be affected by regional blocks or server issues. A “Couldn’t Sign In” or “No Internet Connection” error during the login process can often be resolved by using a VPN to connect from a different region.
- Reset Password: If there is any doubt about the credentials being used, the most straightforward step is to use the Forgot Password link on the login screen to reset the password and try again.
- Wait It Out: The “Maximum number of attempts reached” error is a security measure to prevent brute-force attacks on an account. This is a temporary lockout. The only solution is to wait, typically for 24 hours, before attempting to log in again.
- Clear Cache: A corrupted app cache can sometimes interfere with login sessions. Clearing the cache as described in(#12-the-cache-cleanse-a-fresh-start-for-your-app) may resolve the issue.
7.2 Pro Subscription Not Recognized After Purchase or Login
A major source of frustration for paying customers is when their Pro subscription is not recognized, and the app continues to prompt them to “Join Pro.” This issue is almost always caused by a mismatch in the login methods used across different devices, a consequence of CapCut’s fragmented account management system.
- The Root Cause and Solution: The core of the problem is that CapCut treats different authentication methods (e.g., Sign in with Apple, Sign in with Google, Sign in with TikTok, Sign in with Email) as entirely separate and distinct accounts, even if they are all linked to the same underlying email address. This leads to the following common failure scenario:
- A user purchases a Pro subscription on their mobile phone, authenticating the purchase through their Apple ID or Google Account.
- Later, they install CapCut on their PC and attempt to log in using the “Sign in with Email” option, entering the same email address associated with their Apple/Google account.
- Instead of accessing their existing Pro account, CapCut creates a brand new, separate, non-Pro account under that email login. The user is now logged into a free account and has lost access to their paid features.
- If the subscription was purchased via “Sign in with Google,” then “Sign in with Google” must be used on the PC.
- If the login method used on mobile (e.g., Apple ID) is not available as an option on the PC version, a linking step is required. The user must open the CapCut app on their phone, go to
Me > Manage Account > Connected Accounts, and link a Google or Facebook account to their existing Pro account. They can then use that newly linked Google or Facebook account to sign in on the desktop, which will grant them access to their Pro subscription.
7.3 Cross-Device Login Issues (QR Code, etc.)
Some users report that login methods designed for convenience, such as scanning a QR code or using a TikTok account to log into the desktop version, fail to work even when they are properly logged in on their phone. This is typically indicative of a temporary server-side bug rather than a user-side error. The recommended course of action is to try a different login method if available, or to contact CapCut support directly at [email protected] and try again at a later time.
Part 8: A Word of Caution: Understanding CapCut’s Terms of Service
Beyond technical glitches and performance issues, a significant consideration for any CapCut user is the platform’s Terms of Service (ToS), particularly following a major update in June 2025. These terms have profound implications for content ownership and privacy, representing a potential problem that is legal and ethical rather than technical. An expert-level understanding of the app requires awareness of these policies.
8.1 The June 2025 Terms of Service Update
The updated ToS dramatically shifted the balance of content ownership away from the creator and toward the platform. In simple terms, by agreeing to the terms and using the application, users grant CapCut (and its parent company, ByteDance) a permanent, irrevocable, royalty-free, sublicensable, and transferable right and license to use any content uploaded to the platform.
- Key Permissions Granted to CapCut:
- Broad Usage Rights: CapCut can use, modify, adapt, reproduce, create derivative works from, publish, and distribute user content for any purpose, worldwide, without compensating the user.
- Waiver of Moral Rights: Users waive their “moral rights,” which means CapCut can alter or use content in ways that might misrepresent its original context or intent, without the creator having recourse.
- Persistence After Deletion: This license is irrevocable. Even if a user deletes their content from the app or closes their account entirely, CapCut retains the rights to the content that was previously uploaded.
- Use of Likeness: The terms grant CapCut the right to use a user’s likeness, voice, and other personal attributes that appear in the content, potentially for advertising or other commercial purposes, without further permission.
- Applies to All Content: These rights apply to all content uploaded to the platform, including private projects and drafts that were never published publicly.
8.2 Implications for Creators and Journalists
The expansive nature of these terms creates significant risks that users must consider.
- For General Users and Creators: Any personal videos, family moments, client work, or exclusive content uploaded to CapCut should be treated as potentially public and subject to use by ByteDance. The convenience of the editor comes at the cost of relinquishing control over one’s own creative work.
- For Journalists and Professionals: The implications are particularly severe. The ToS effectively nullifies any expectation of confidentiality for journalistic material. Uploading sensitive footage—such as an interview with an at-risk source, a whistleblower, or content from a conflict zone—means that material is no longer secure. It could theoretically be accessed, reused, or repackaged by entities outside of the journalist’s control. Furthermore, the terms place all liability for copyright infringement squarely on the user. If a journalist uses third-party music or imagery without the proper license, they are solely responsible, while CapCut offers no legal protection. This creates a paradox where a tool that simplifies production could undermine the core journalistic ethics of source protection and editorial independence.
8.3 Recommended Best Practices
Given these terms, users should adopt a cautious and informed approach to using CapCut.
- Audit Your Content: The most important practice is to treat any file uploaded to CapCut as if it were being made permanently public. Do not upload sensitive, confidential, or proprietary material to the platform under any circumstances.
- Consider Alternatives for Sensitive Work: For professional projects, client work, or any content where ownership and privacy are paramount, it is strongly recommended to use alternative editing software with more traditional and creator-friendly licensing terms, such as Adobe Premiere Pro, DaVinci Resolve, or Final Cut Pro.
- Use for Final Edits Only: If using CapCut is unavoidable due to workflow or feature requirements, a risk-mitigation strategy is to perform initial edits offline in a different program and only upload final, non-sensitive clips to CapCut for applying specific effects or templates, rather than uploading raw, unedited footage. Convenience can no longer be the sole factor; it must be weighed against the significant legal and editorial risks.
Conclusion
Keep your app and device updated, and you’ll be prepared to handle any challenge that comes your way. Happy editing!